Brick in the Cloud

The Lego Machine Cloud Project


1 Comment

EV3 Machine Cloud Software Uploaded

I’ve now uploaded the binary Java Archive (JAR) for the EV3 control software, as well as the Force.com software in AppExchange packaged form. These coupled with the required hardware and installation of LeJOS, is all you need to control your EV3 creations from Salesforce. You don’t need to be a developer, but quite competent with installing tools and following technical instructions. I’ve written up some instructions as follows, enjoy!

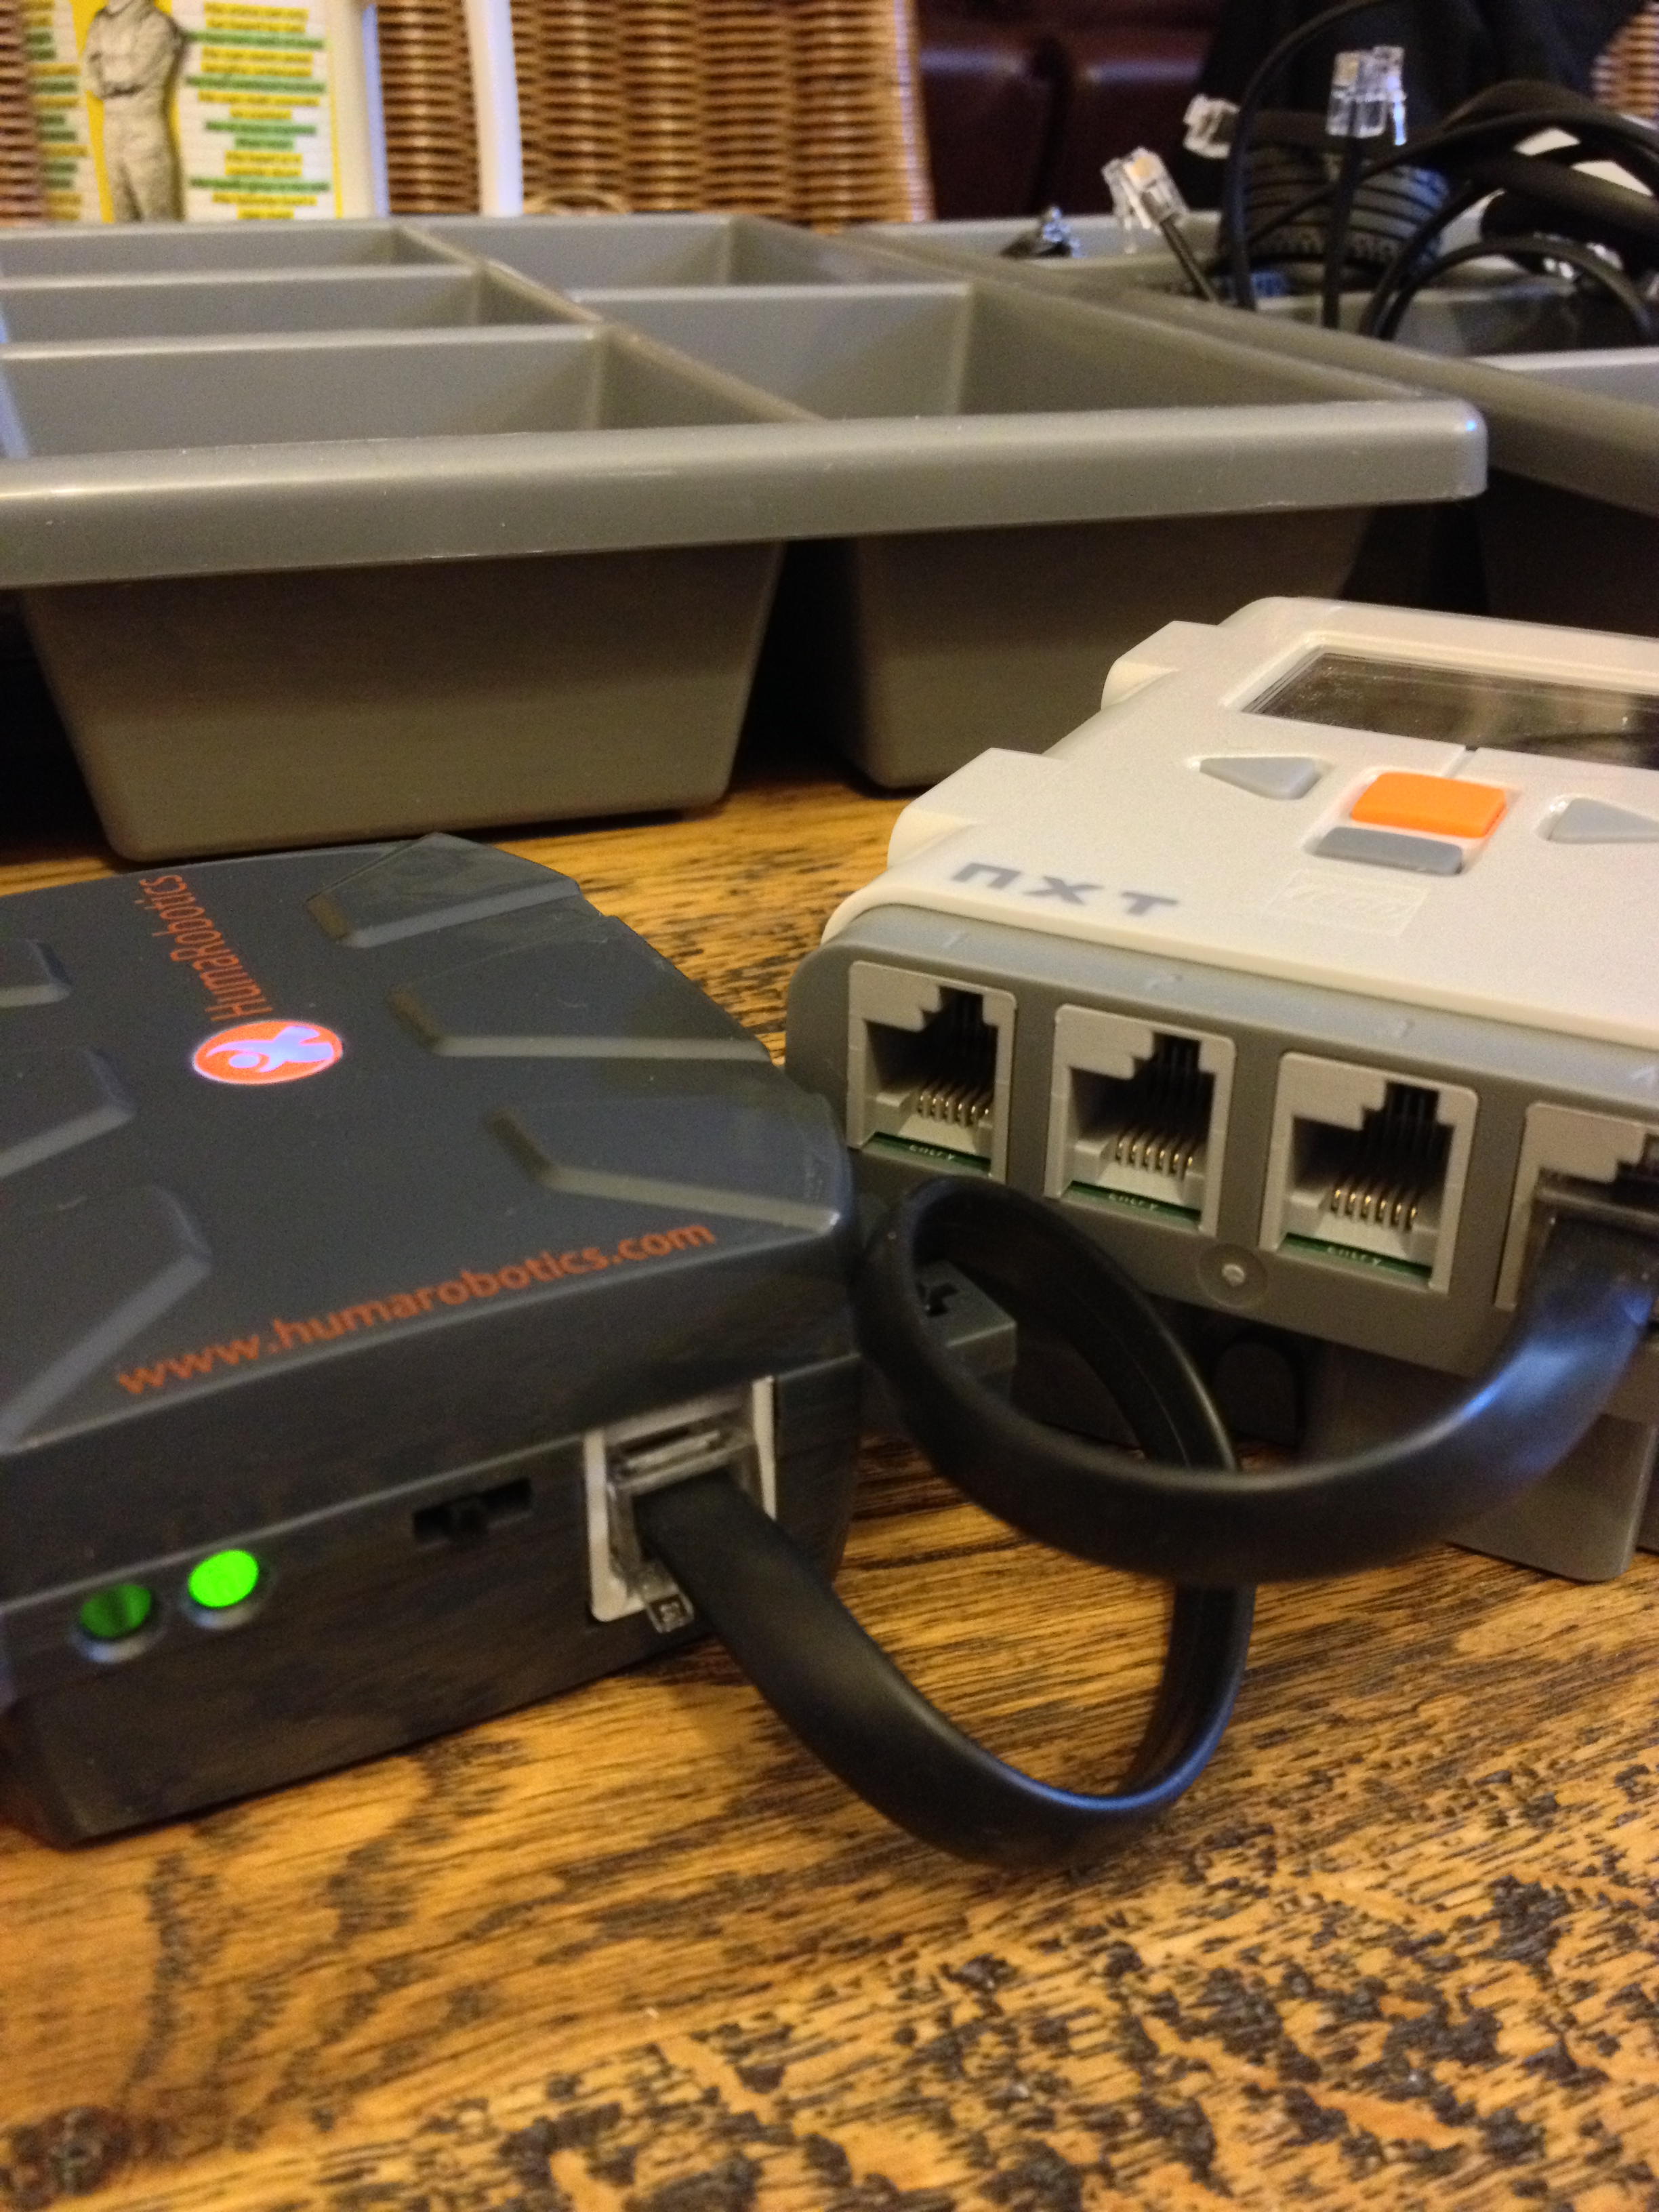
  1. Setup your EV3 as described here, confirm LeJOS is installed and you can see the menu. It must also be connected properly to your Wifi. This can be a challenge sometimes, but there is an excellent LeJOS forum here!
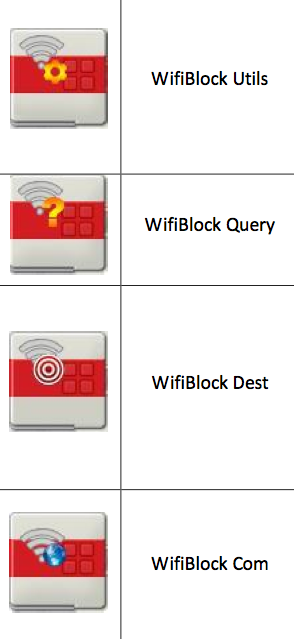
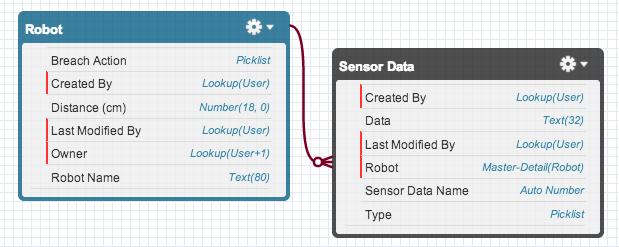
  2. Install the Machine Cloud package, this provides the Robot, Command and Program objects used to control the robot and connect it to Salesforce, using the Pairing process, more on this later. You can learn more about these objects and how to use them in my session video. The package install link is here, after installing…
    1. Got to Setup and under Connected Apps, edit the EV3Force Pairing app
    2. Select ‘Admin approved users are pre-authorised‘ and press Save
    3. Add your profile to the list of permitted profiles, by scrolling down and selecting Manage Profiles
  3. Got to the Robots tab and create a new record, name does not matter, after saving the record you should see a prompt to enter a Pin number (if you don’t check step 2 sub-steps). Leave this for now open.
  4. Download the ev3force.jar file from here and copy to the EV3 robot using the EV3Control tool, as described here (if you have a problem running the EV3 tools on your Mac/PC check the LeJOS forum).
  5. Run the ev3force.jar program on the EV3 using the LeJOS menu on the device, after a while you should see a Pin number on the screen. Go back to the Robot record you created in step 3 and enter the Pin number. Your device will then be paired with the org.
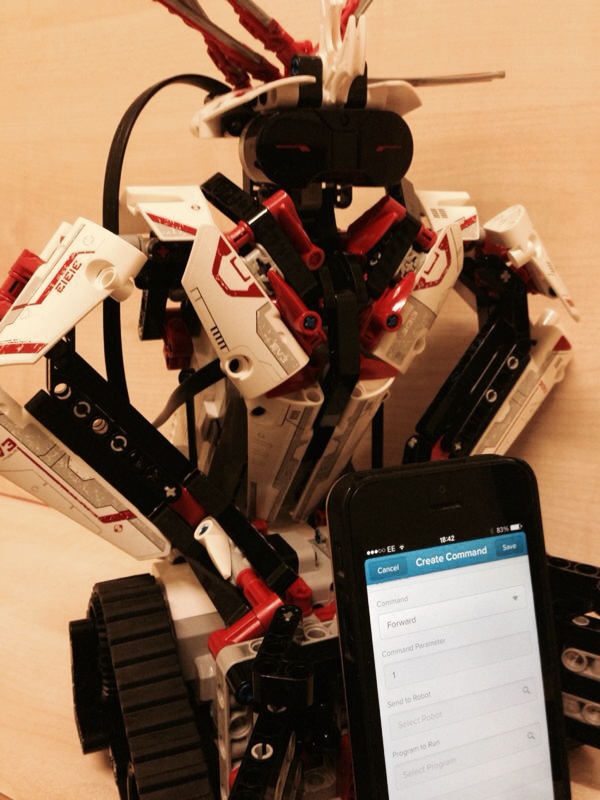
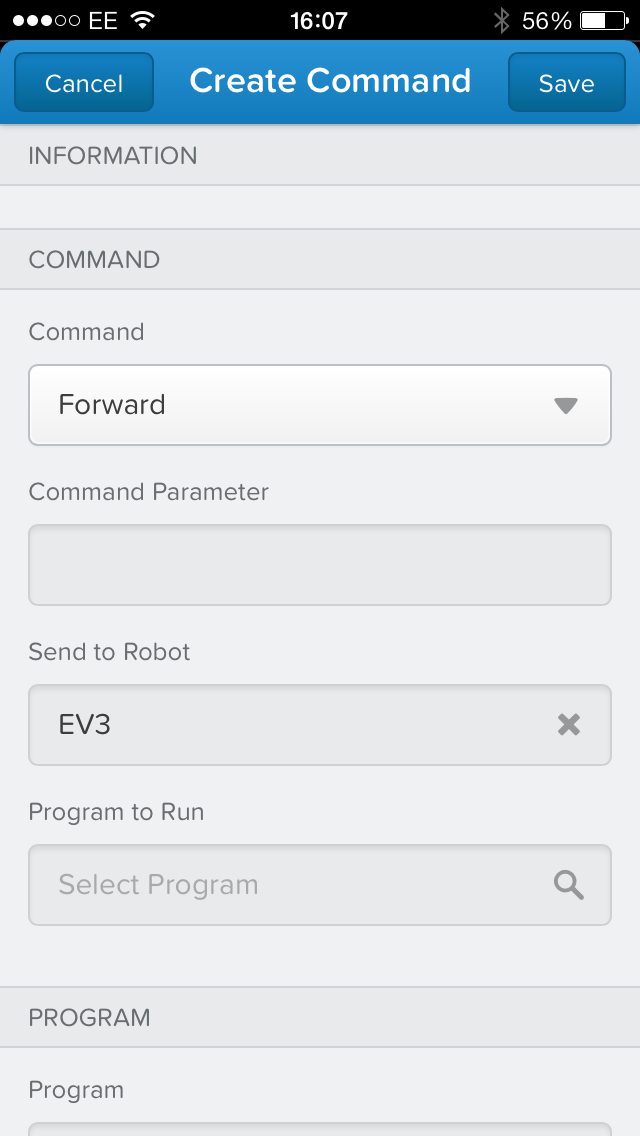
  6. Go ahead and create a Command record, to switch on the robots LED for example, more examples are in my video.


Refer to my Dreamforce 2015 slide deck for further screenshots and instructions and also my video. Finally please feel free to ask questions here or preferably i can offer help via the GitHub Issues page here.

IMPORTANT NOTE: I will also in due course upload the source code for both Java and Apex code, in the meantime, here is a quick Gist of the EV3 Java code. Note also that their is a pairing aspect to this, currently hosted on Heroku, this can be shared by all robots using the code above. Though please use only developer or test/play orgs with this service.


2 Comments

Prepare your Robot for Dreamforce 2014!

I’ve been lucky enough this year to get a whole session at Dreamforce 2014 to demonstrate not one but two Lego Mindstorms robots controlled by the Salesforce1 cloud platform, join me at the session if you like!

LejosWe will be giving away later in the week a fully configured robot running Lejos with the required Wifi hardware. Or if you want to bring yours along to the DevZone IoT area on Wednesday 2pm i can help with setting up the memory card, but you’ll need to provide the hardware!

LegoMachineCloudHardware


6 Comments

Declarative Robot Programming via Salesforce on your Mobile with Salesforce1

photo
20131119-081643.jpgThe Lego MachineCloud project has received a massive boost in the form of two great technologies from Lego and Salesforce! I’m so pleased to confirm that my test to get the
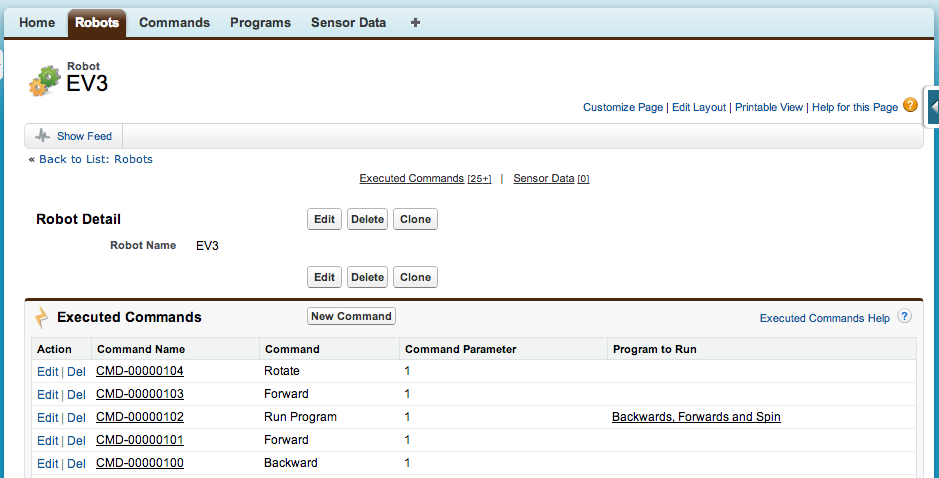
 Salesforce Streaming API working on the EV3 has been a raving success! This technology allows the robot to be highly responsive to commands from Salesforce, including the hugely exciting brand new Salesforce1 mobile app.

Having uploaded the required Java libraries to the brick and adapted some Java code from a previous project. I then extended the Force.com objects I created for the previous robot to create a more “declarative” programming approach. That can be driven by Command records created by the user in the latest Salesforce user web and mobile interfaces!

Streaming Commands from the Force.com Machine Cloud

robotHere you can see a screenshot of the Robot record showing a list of commands that it has executed, note the New Command button! Simply click this button and select the type of command you want, hit Save and often before the screen can even refresh the EV3 will get the streaming API event notification and perform the command! I literally lept up from my chair the first time it did this. I’ve uploaded the source code to the project to GitHub, feel free to take a look and see how its all done!

Declarative Robot Programming via your Mobile!

programI have extended the Robot and Command objects with another object called Program. This is a container for multiple Command records, allowing you to design a program in the Salesforce UI and then create a single Command record to execute that Program!

mobilecommand

Having updated my version of the Salesforce mobile app, now known as Salesforce1, i quickly found that my Command object is now also available in this application. Within a few taps my EV3 was now also responding to commands sent via my phone! Now that is a true “No Software” reality! Amazing stuff Salesforce!

Dreamforce

I’ll be bringing the robot you see in the video to Dreamforce with me next week, where I cannot wait to see what people think of this approach to programming the EV3 in the “Internet of Things Lab” session. Its a basic framework at this stage but the potential is huge for having Robot’s socialise (from all over the world!) on the Salesforce “Machine Cloud” platform. See you at Dreamforce next week!

Brief Demo Video


1 Comment

Programming the new Lego Mindstorms EV3!

EV3RSTORMI’ve finally got my hands on the next generation of Lego programmable bricks, the Lego Mindstorms EV3. It has a number significant improvements over the NXT shown in my previous posts. Most notably for me is the improved processor and the fact that it actually runs Linux, not only that but Lego have shared the source code to the firmware as well! Bravo Lego!

Screen Shot 2013-11-14 at 00.48.30

It has only been out a short while and already it has been embraced by the community and a surprise corporate interest from none other than Oracle themselves! I  wanted to try Java on the last brick, but read that it had a number of limitations and caveats. Not so with the EV3, Oracle have provided a fully fledge Embedded version of their JVM for use on the brick, more on this in a moment! Thank you!

photo

I also of course needed to get the brick talking to the internet, once again the EV3’s improvements gave it big step forward from the rather large third party Wifi receiver I found for the last robot. This time, its time to plug in the worlds smallest Wifi USB dongle, the Edimax EW-7811Un (note this does not work with the standard Lego software currently)! Check it out its tiny, ideal for cloud enabling robots!

Finally a Micro SD card slot gives the ability for extra storage, as well is the ability to create a bootable partition on it. Meaning you don’t have to replace the standard firmware to get started, just build an appropriately formatted and configured SD card image (not quite as easy at present as you’d imagine, but worth the effort!) and the device boots from that if installed.

lejosLogoThis is exactly how the clever developers at leJOS have provided a toolkit to run the Oracle JVM with the appropriate configuration to run regular Java code! With a little help from Juan Antonio Breña Moral and his website on EV3 programming. I was also soon up and running with a pretty slick Eclipse based devleopment environment and a deployment script taking the otherwise heavily clicky task of pushing the code to the device down to a matter of a few seconds using an Ant script. Next step Salesforce connectivity! I’d settle for nothing less than using the Salesforce Streaming API for this robot, and I was not to be disappointed…

ev3dev


3 Comments

Realtime Capture of Lego Robot Sensor Data in Force.com

In my last blog I focused on getting the Lego robot to understand a selection of commands given to it via posts I sent to its Chatter persona via Salesforce’s Chatter mobile app. In return it gave basic confirmations (as post commonts) as having executed the commands.

This time I wanted to explore the sensors that came with the kit. And ways in which I can push the data from those sensors into Force.com for further processing and analytics. Eventually enabling dynamic adaption of the robot through a combination of Apex code running in the Cloud as well as the NXC code running within the robot.

ultrasonic

The Ultrasonic Sensor is quite an interesting one, it allows the robot to read the distance (in cm) of objects in front of it. The video below shows this sensor in action, as it feeds its sensor data (ranging from 0-255 cm) back to Salesforce in realtime!

Normally Salesforce only shows new data when you refresh the page. I wanted to see the data as it arrived. For this I turned to the Salesforce Streaming API. Having created a small Visualforce page, I was able to connect to a topic i created to display sensor data on the page as the robot sent it.

As you can see in the short video I have two custom objects, Robot and Sensor Data. Each record on the Robot object, reprepsents a Robot in the physical world (I’ve got quite an exciting ‘robot social’ vision for this concept btw!). The Sensor Data object is a child and thus the data it captures is linked with the specific robot that generated it.

Screen Shot 2013-03-17 at 22.05.26

As before I am currently using a custom Heroku RESTful service to accomplish the connection to Salesforce, it is called via the following NXC code.

SetSensorUltrasonic(S4);
int sensorVal = SensorUS(S4);
string data = NumToStr(sensorVal);
string result = quickGETHostname(WB_PORT,
    "brickinthecloud.herokuapp.com",
    "/services/sensor?sensor=Ultrasonic&data=" + data);

Whats next?

If you looked closely at the video you will see my Robot object has a couple of fields I didn’t use in the demo! The ‘Distance’ and ‘Breach Action’ fields!
Screen Shot 2013-03-17 at 22.18.43
In a future post I plan to use these to dynamically drive parts of the robots programming by changing these values and have it change its behaviour dynamically (without the need to download new code to it). To do this, I will revist the Chatter command integration from my previous blog. Adding the ability to respond to Chatter Field Tracking events!
Screen Shot 2013-03-17 at 22.19.04


7 Comments

Its alive! Lego Robot and Salesforce Chatter Demo

After a few late nights / mornings I finally got my second robot chatting with me via Salesforce Chatter! I chose to switch designs as it was easier to mount the Wifi sensor and move this robot around than the Alpha Rex. You cannot see it in the video but I was controlling it via the Chatter app on my iPhone, I took some screenshots after the video.

photo photo[1]

The NXC code I developed for this communicates to Salesforce via a custom Heroku RESTful Service. Which provides two services /command and /chat that wrap the Chatter API in something easier to code against in NXC. I’ll share the Java code for these  services in a later blog. In the meantime enjoy!

task main()
{
   SetSensorLight(S3, true);
   if (quickConnect(WB_PORT,"ssid",WB_SECURITY_WPA2,"pass"))
   {
    string lastCommand;
    while (true)
    {
     string command = quickGETHostname(WB_PORT,"brickinthecloud.herokuapp.com","/services/command");
     if (command!="") {
       TextOut(0,LCD_LINE1, "Cmd:" + command + "      " );
       if(strcmp(command, lastCommand)!=0)
       {
          string message = "Afirmative!";
          if(strcmp(command, "Status?")==0)
          {
             float volts = BatteryLevel() / 1000.0;
             message = FormatNum("Battery:%5.3f", volts);
          }
          else if(strcmp(command, "Take aim!")==0)
          {
             RotateMotor(OUT_B, 180, 180);
             RotateMotor(OUT_C, 180, 180);
          }
          else if(strcmp(command, "Fire!")==0)
          {
             RotateMotor(OUT_A, 360, 360);
          }
          else if(strcmp(command, "Light on!")==0)
          {
             SetSensorColorRed(S3);
          }
          else if(strcmp(command, "Light off!")==0)
          {
             SetSensorColorNone(S3);
          }
          string response = quickGETHostname(WB_PORT,"brickinthecloud.herokuapp.com","/services/chat?message=" + message + "&comment=true");
          TextOut(0,LCD_LINE1, "Response:" + response + "      " );
          strcpy(lastCommand, command);
       }
     }
     else {
       TextOut(0,LCD_LINE1,"GET ERROR");
     }
    }
   }
}


2 Comments

First Robot Built

I’ve completed my first build and run a few programs from the standard Lego software to test the mechanics. Its a pretty impressive peace of kit! Here are a few pictures of the standard Alpha Rex robot. With one major enhancement, can you spot it? It is capable of communicating with the internet via its fetching Wifi back pack!

photo (2)  photo  photo (1)

After doing a few tests with the backpack idea, sadly it does effect the balance of the robot, so some tweaking might be required, I’m thinking tracks….


Leave a comment

NXC Programming

NXC (Not eXactly C) is an alternative way to program Lego Mindstorms. While the drag and drop interface is actually pretty good, I wanted the flexibility of a programming language. Having determined that HumaRobotics sensor has a NXC library I set about installing the necessary custom firmware and compiler on my Mac. It turns out the community tooling and IDE’s are much more advanced for Windows, however some support for Mac users does exist.

next_tools

Having installed the replacement firmware and thankfully avoided bricking my brick! The new firmware actually still permits the standard Lego software programs plus NXC programs to be downloaded. I set about trying a few NXC programs, they compile and downloaded to the robot in a few seconds. Here is my first program that reads the value of the colour sensor!

task main()
{
    SetSensorColorFull(S3);
    while(true)
    {
        ColorSensorReadType csr;
        csr.Port = S3;
        SysColorSensorRead(csr);
        if (csr.Result == NO_ERR) {
            NumOut(0, LCD_LINE1, csr.ColorValue);
        }
        Wait(1000);
    }
}

I was also able to get the sample WifiBlock NXC code working. It demonstrates the robot making some HTTP GET to some simple Web Services hosted on the HumaRobotics website. Displaying the results on its LCD display.

#define WB_PORT IN_4

byte humaroboticsip[]={88,190,16,18};

void getDateTime() {
  string date=quickGET(WB_PORT,humaroboticsip,"/wb/date.php");
  string time=quickGET(WB_PORT,humaroboticsip,"/wb/time.php");
  if (date!="" && time!="") {
    TextOut(0,LCD_LINE1,"Date: "+date+"      ");
    TextOut(0,LCD_LINE2,"Time: "+time+"      ");
  }
  else TextOut(0,LCD_LINE1,"GET ERROR");
}

void getCityFromZIP(string country,string zip) {
  string res=quickGET(WB_PORT,humaroboticsip,"/wb/cp.php?c="+country+"&z="+zip);
  if (res!="") {
    TextOut(0,LCD_LINE1,zip+", "+country+"         ");
    TextOut(0,LCD_LINE2,res+"          ");
  }
  else TextOut(0,LCD_LINE1,"GET ERROR");
}

task main()
{
  byte ip[]={192,168,0,222};
  byte mask[]={255,255,255,0};
  byte gw[]={192,168,0,1};
  if (quickConnect(WB_PORT,"myssid",WB_SECURITY_WPA2,"wifipass",ip,mask,gw)) {
    while (true) {
      getDateTime();
      getCityFromZIP("US","02101"); // Boston
    }
  }
  else {
    TextOut(0,LCD_LINE1,"CONNECT ERROR");
  }
  Wait(60000);
}

I’m quite pleased with this weekends work, in between fixing a family laptop with a corrupt master boot record, its been a tech heavy weekend! Fun!


Leave a comment

HumaRobotics Wifi Block

Key to this project is a means for the robot to communicate with the outside world on its own without the aid of a PC or MAC. Lego Mindstorms robots support Bluetooth and USB connections with a PC or Mac but lack the ability to use a Wifi network.

Enter the HumaRobotics Wifi Block! This plugs into an available sensor port on the NXT. HumaRobotics developers have also done an excellent job of integrating with the Mindstorms drag and drop programming tool, so I was able to get the Wifi Block configured to my Wifi network and thus to the internet pretty easily *.

Screen Shot 2013-02-24 at 12.25.23

There are 4 programming blocks provided in this environment, the WifiBlock Utils block allows the NXT to communicate with the Wifi Block. By dragging this onto the programming surface you can give it the usual Wifi connectivity details.

Screen Shot 2013-02-24 at 12.27.33

Once the indicator light on the block is a steady green, I was able to confirm the connection by pinging it!

photo

Screen Shot 2013-02-24 at 12.37.10

Now that I had made a connection, I was keen to start building. There are many robots that can be built with the kit. I am starting with one of the advanced ones, the Alpha Rex robot. I’ll be giving him a more appropriate name later!

* A lot easier in fact, than getting the Mindstorms software running on Mac OS 10.7. I was pleased to find a great Lego resource on the net, linked with another favourite pastime of mine, StackExchange! Lego Answers Beta.